Labels

Showing posts with label Live. Show all posts

Sunday, April 7, 2013

Live: Frozen Lemonade Pie

A Summertime Favorite
 
We finally had some sunshine and warm weather this weekend, hopefully it is the break through to spring. With the good weather I thought it was time for one of our favorite warm weather desserts.
 
Frozen Lemonade Pie
It is delicious!
 
 
*Warning* There is no meringue in this pie.*

Ingredients:
graham cracker crust (of course you could make your own, but I just buy the pre-made one)
2 cups heavy whipping cream
8 oz sweetened condensed milk
6 oz frozen lemonade concentrate
 
Directions:
1. Whip heavy whipping cream until it forms stiff peaks.
2 . In a separate bowl mix sweetened condensed milk and frozen lemonade concentrate.
3. Fold in milk and lemonade mixture into the cream.
4. "Pour" into pie shell and freeze for at least 2 hours.
 
Variations:
Of course you could use a variety of frozen drinks such as pink lemonade, or strawberry lemonade. (I'm not sure how juices would taste.)
 
It is also wonderful topped with fresh berries. 


Tuesday, February 5, 2013

Live: Be Mine Banner

In the spirit of Valentine's Day I wanted to add a little something to my entertainment center, since I don't have a mantle.
 
I made this cute little "Be Mine" banner. It was very easy, and I only needed a few things.
 
Scrapbook paper is obviously the easiest, but I found this paper as a blank card, and then cut it to size (4x4 inch).
I then used my Cricut to cut out the little heart in each corner.
I also used my Cricut to cut out the "Be Mine" and the heart on a pearly pink.
 
 I used a thick twine as my ribbon, then tied some velvet ribbon I had between each card.
I hung it from the tiny clear 3M hooks, that way I can easily change it out for each season.

I did matte the heart on a red paper, and used foam dots to make it stick up a little.
 
All in all I was done in about 15 minutes. 

Saturday, February 2, 2013

Live: Caramel Apple Dip

Oh, how I wish I could truely photograph food...
 

Ingredients:
16 ounce container caramel 
8 ounce softened cream cheese
1/2 bag Heath pieces, chocolate and toffee
 
Directions:
1. Mix caramel and cream cheese together until smooth. (This is much easier if you use a stand mixer or a hand mixer.
2. Stir in Heath pieces.
3. Slice apples. I also put my apples in a ziploc bag with about a tablespoon of lemon juice to help the apples from turning brown. 

This is a half portion of the recipe, served with 3 sliced apples. I would rather have to cute more apples later than have apples that turn brown.


Live: Gulit Free Grape Salad

I have absolutely fallen in love with this easy to make, healthy to eat dessert-snack-whenever treat.
 
Ingredients:
2 pounds seedless red or green grapes (washed)
4 ounce  fat free cream cheese (softened)
½ cup fat free sour cream
¼ cup splenda
½ tsp. vanilla
½ cup chopped pecans
1 Tblsp. brown sugar (not pictured)
Directions:
1. Mix together cream cheese, sour cream, sugar, vanilla and brown sugar.
2. Fold in grapes and pecans.
3. Refrigerate until ready to serve.
Will keep up to 3 to 5 days in the refridge.
 

(This is a half portion, in a 1 quart bowl, so you can imagine a full portion.)


Friday, January 25, 2013

Live: Burlap Wreath

I also made this wreath for a Christmas present.

I tied pieces of burlap onto a wire wreath form, and then hot glued wooden stars to the blue burlap to complete the Americana look.


I followed this tutorial:
http://inbetweenlaundry.blogspot.com/2010/09/tutorial-c-u-t-e-and-easy-autumn-wreath.html

Live: Burlap Door Hangers


     I haven't been able to post this because the Burlap Door Hangers I made were Christmas Presents. So finally I get to post them, and I am pretty excited.


Materials:
Burlap (I used pre-colored burlap for the footballs and basketballs. It made it so much easier.)
Acrylic Paint (your paint colors will depend on what your team colors are of course. You will for sure need white for the football stripes and stitches, and black for the basketball stripes.)
Foam Paint Brushes (Regular and Round)
Paint Brush
Puffy Paint (optional)
Hot Glue Gun and Glue Sticks
Wire
Ribbon
Glass Beads (optional)


I made templates for the shape, stitches and the stripes on the side because I was making several. I free handed these templates.
I also made templetes for my letters (partially because I'm a perfectionist.) I used my Cricut for these templates.


Directions:
1. To make my burlap a little stiffer I sprayed starch on it and ironed it before cutting.
2. I used my football and basketball stencil to trace the outline shape on the burlap then cut out the burlap for one side. (I don't like to cut the front and back in the beginning because they don't end up the same in the end.)

Football:
3. Used the white paint and my stencils to paint the stripes on each side and the stitches in the middle. It took 2 coats. Let dry.
4. Paint the logo and phrase in the middle. I had a stencil for this, 1 piece of paper. Because its paper I had to go around the edges and hold it while I was painting. I put one coat of paint on then pulled up the stencil. I did the second coat without a stencil. Let dry.
5. I put the stencils back on the stripes on the sides of the football to paint the polka dots. Using a round foam brush. The stencil keeps the extra part of the polka dot from getting on the brown burlap. Let dry.
6. When all is dry I outlined the stripes, polka dots, and logo in puffy paint. This will take at least 4 hours to dry.

Basketball:
3. Paint the logo and phrase in the middle. I had a stencil for this, 1 piece of paper. Because its paper I had to go around the edges and hold it while I was painting. I put one coat of paint on then pulled up the stencil. I did the second coat without a stencil. Let dry.
4. Basketball Lines- this is the hard part because it is truely eyeballing it and there are no second chances. I kept an image up on the computer to reference while I was drawing it, and I did it a fine point Sharpie first. After I had the lines predrawn I used a regular paint brush to paint the lines. Let Dry.
5. Using the little round foam brushes and a paint brush add the polka dots around the logo. Let dry.
6. When all is dry outline the logo in puffy paint. This will take at least 4 hours to dry.

7. Ready to Hot Glue! I hot glue mine to a solid piece of burlap, then cut it out. I think this makes a better pair and you get cleaner lines.
8. I used a gluestick to wrap my wire around for the part on the front of the burlap. Then poke through the burlap and wrap around the glue stick again to help it stay in place. (If you are using beads put them on before you twist but so that they are not infront of the burlap. The beads should be above the second twist. I also twist the wire after the beads to help them stay in place.) Repeat for the other side)
9. Tie your ribbon onto the wire behind the burlap, I normally do it right about the twist, it also helps to raise the ribbon a little to make it more visible. (Don't forget to burn the edges of your ribbon.)


Sunday, December 30, 2012

Live: Burp Cloths How To

     I live in an area that personalized baby items are extremely popular, and as you know popularity also means high price. One of the most simple things that have become popular are cloth diapers turned into burp cloths with fabric stripes, ribbon tags, monogramming, and applique. I started by adding cloth stripes to the center of my cloth diapers, and I am going to have a few embroidered. Keep in mind sewing is not my thing, I have a friend helping me learn. Also, if you have an embroidery machine or a friend who does, it makes a great addition.


 Now because the cloth diapers are not perfectly square, I wanted my fabric to be square. This included having no extra flap of material hanging out on my corners.


Materials:
Cloth Diapers (pre-folded)
Fabric of you liking (really about 8 inches wide)
Sewing Machine with matching thread
Pins
 
Step 1: "Pre-Wash" Fabrics so it is all pre-shrunk. You can do this by soaking it in very hot water and then drying it, not actually washing it.


Step 2: Cut your Fabric
 This part should be easy, but the cloth diapers have no consistency. You want your final product to be a little larger than the thick part of the diaper. I suggest about an inch wider on each side and each end. Then when you fold your fabric you will have a quarter to a half inch extra on each side.
 
Step 3: Folding Corners
Pick a corner and folder corner to angle as shown.


Step 4: Fold Side
After you have the corner folded in you are ready to fold the first side. It is really important that you fold a straight line. You can see my pin on the right side of the picture to help hold my side in place. Although this is only the first side it is important to consider how much you are folding to insure that you have a wide enough piece of fabric in the end. At the top of the triangle created by the folds is where your corner will be.


 Step 5: First Corner
 Fold the other side, insure that it creates a straight line, and bring it in far enough so that it meets the other fold creating your fist corner. When finished be sure the pin the corner.


Step 6: Repeat for All Corners
Paying attention as you go to make sure that you keep the fabric wide enough to cover the center of the diaper, continue to fold each corner as described in steps 3-5.  When you are finished you should have a piece of fabric that is a little wider than the center part of the diaper, but you do not want the fabric to hang off on the ends.


Step 7: Flip Fabric, Pin into Place, and Sew 
The easy part right?! Move the pins to the front side of your fabric while also pinning to the cloth diaper. Pick a coordinating thread color and you are ready to sew.


The finished product. How cute would this be with a monogram on it?


Wednesday, December 19, 2012

Live: Italian Chicken Crescent Rolls

They were mighty yummy!
 
It all starts with 3 simple ingredients: 8 ounces of cream cheese (softened), 1 can of white meat chicken, and an 8 pack of crescent rolls. There are som many varitations of this recipe from here. They make great easy dinners, and an awesome finger food for get togethers.


Italian Chicken Crescent Rolls:
 I only added 3 ingedients: 1 tablespoon Italian seasoning, 1/2 cup shredded cheese, and pizza sauce for dipping.
 
I use my stand mixer when I start because cream cheese is tuff to mix by hand.
Directions:
1. Beat cream cheese.
2. Add in Italian seasoning and cheese, mix together.
3. Strain chicken and then cut into small pieces.
4. Add chicken to cream cheese mix, then mix together.
5. Open crescent rolls onto cookie sheet.
6. Scoop mixture onto each crescent roll (it's about a 1/4 cup).


7. Wrap crescent roll around the chicken.  


8. Bake at 350 degrees for 10-12 minutes, or until golden brown. 

 9. When the crescents are close to being done heat up the pizza sauce.
 
Serve and Enjoy!


Sunday, December 16, 2012

Live: Meatballs

This is one of those recipes that you almost have to make people try the meathballs before you tell them what is in them. 3 ingredients, in the crock pot for 6 hours, and delish!

Ingredients:
meatballs (I used the bag at Wal-Mart, it has about 70 meatballs in it.)
1 jar chili sauce
small jar grape jelly

Directions:
1. Dump all ingredients in the crock pot and mix together. It will not mix completely, but just stir it around. I use a crock pot liner because it can be a little sticky.
2. Cook in the Crock Pot for 6 hours on low.
3. Stir and Enjoy!

Monday, December 3, 2012

Live: Peanut Butter Rice Crispy Reindeer

Who doesn't love a quick, easy dessert that the kid's will love (and the adults too)?
Three Simple Ingredients:
3 Cups Rice Crispy Cereal
7 ounces Marshmallow Creme
1 cup Crunchy Peanut Butter
 
Just these three ingredients make a delicious, easy dessert. No stove needed!
 
Directions:
1. Mix the peanut butter and rice crispies together.
2. Mix in marshmallow creme.
 
(At this point you can scoop out balls of the rice crispies to serve as is. I took it one more step to make reindeer.)
 
3. Using a tablespoon scoop out a portion of the treats. (I rolled mine in crushed rice crispy cereal so that I could shape it a little better.) You will need an oblong shape, with a little more one one end for the nose.
 
Additional Ingredients for Reindeer:

 
Pretzel Twists
Red Hots
Candy Eyes
 
4. Break the pretzel twists in half to look like antlers.
5. Push the antlers into the top of the reindeer head.
6. Attached Red Hot to the nose, and the eyes above. (I used more peanut butter to act as glue.)


Saturday, December 1, 2012

Live: Christmas Explosion

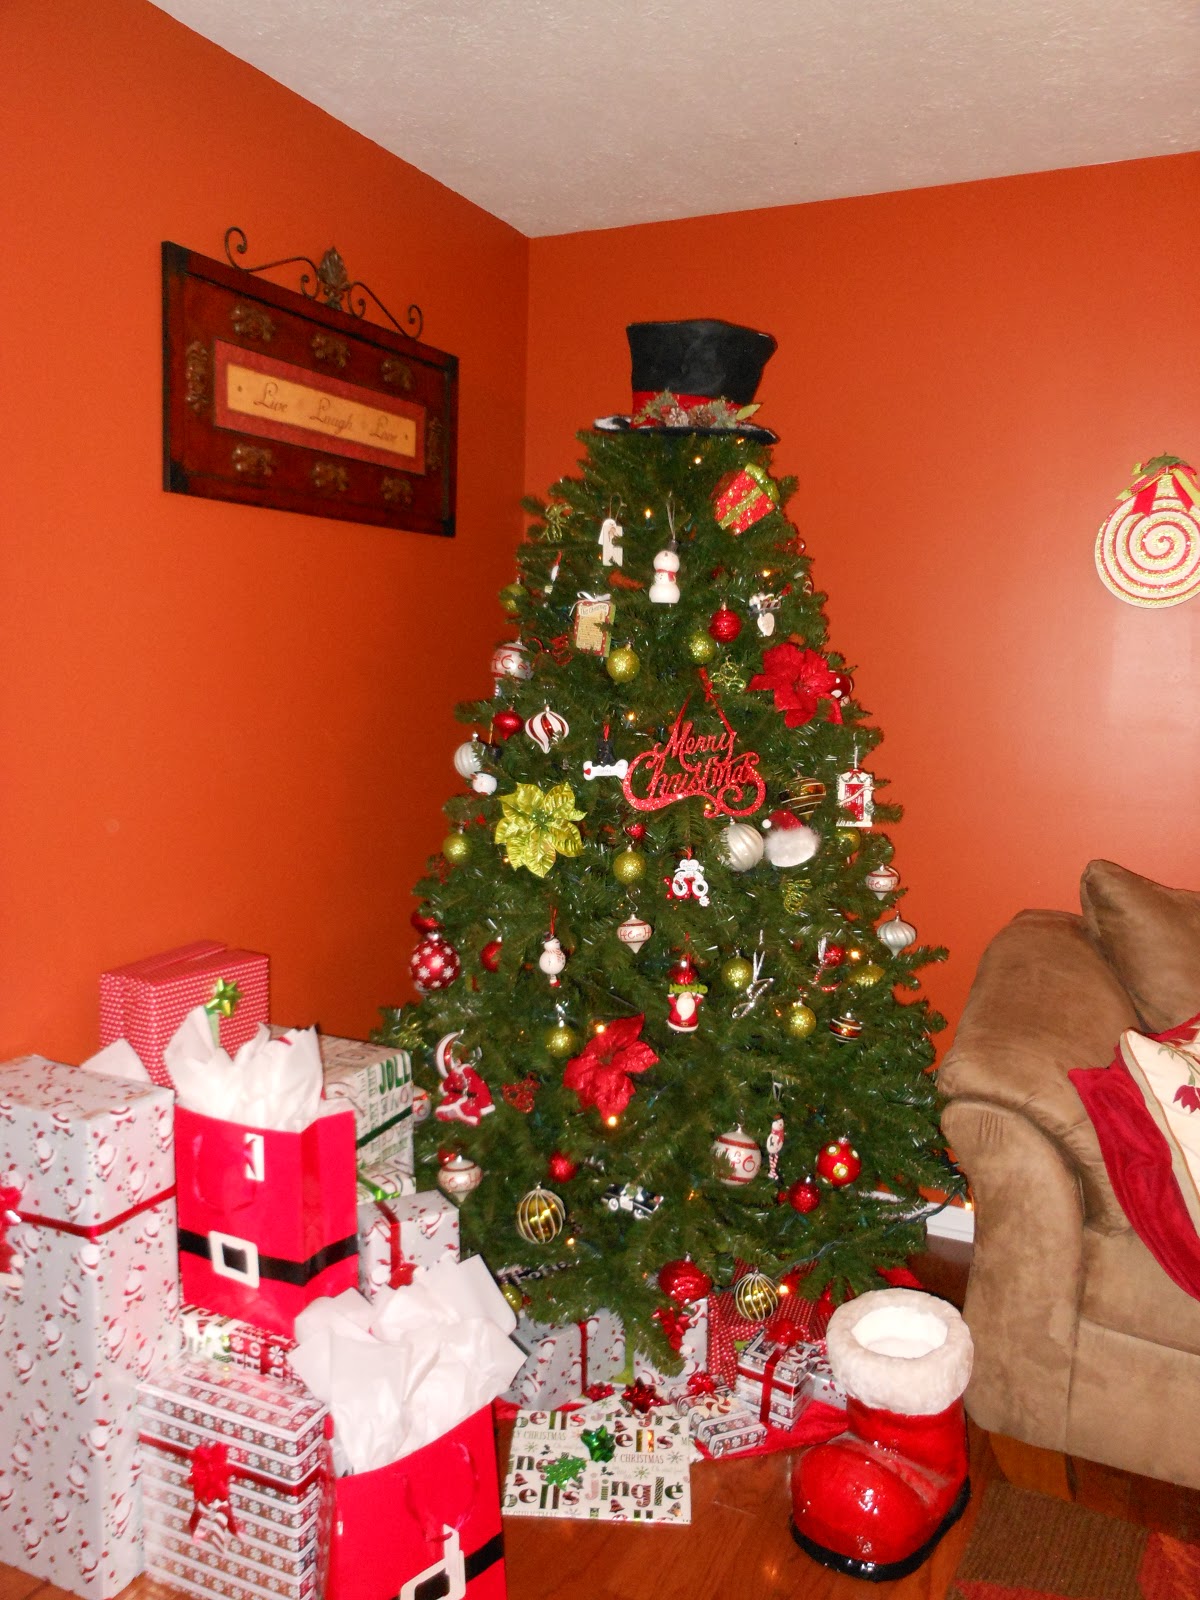
I absolutely love decorating for Christmas, putting on Christmas PJ's, a Christmas movie or CD, and decorating the house. I also love watching the old classices like Rudolph the Red Nosed Reindeer, A Mizer Brother's Christmas, and Santa Claus is Coming to Town.

As soon as you walk into my living room, it is like a Christmas Explosion! Realize we have a fairly small living room. All of my decorations are themed, red, bright green, and white, with snowmen and Santa Claus.

Presents wrapped and under the tree, kind of.

Just the tree, I fell in love with the topper last year, a snowman hat. It was perfect!
 
We don't have a mantle so I decorated the TV stand like I would have decorated a mantle. I bought the gold deer at Kirkland's last year after Christmas, they were a steal!

I decorated my own garland with ornaments left over from my tree, the rest of the decorations follow the same color scheme, with lots of presents. I love the tree on the right side of the TV, I found it last year at Pier 1, it's a topsy turvy tree. I do need something else tall for the other side.
 
How cute is that tree?

Above our couch I normally have a series of 5 pieces of art, so for Christmas I just switch them out with Christmas art I found last year at Kirkland's.

 While I didn't make the Santa Claus on my front door, I do think he is quite adoreable!

I'm still working on this tree, but it's going to take a few years as I build my collection of Hallmark Ornaments for the kitchen. I am excited to buy it this year, it has a measuring cup with utensils sticking out.
 
Have a Very
Merry Christmas!

Saturday, September 22, 2012

Live: Bathroom Vanity

After weeks of being underconstruction the bathroom is finally complete. It literally did take weeks, partially because everything took longer than we expected, and partially because my husband had to work out of town for a week and a half before it was done. Just days before he left, we still couldn't take showers. I put one stipulation on him leaving, I could take a shower. He did get that done, but the vanity had to wait.
 
Now I had measured the hole for the vanity half a dozen times, and I really thought the opening was 30 inches. I hunted for a vanity for monthes. The problem wasn't finding a vanity, but the countertop. The standard size for countertops is a 31 inch, which was not going to work. Then I finally found the perfect one. Until my husband went to put the vanity in the hole. It didn't fit!!!! My worst night mare. It was off by about a half inch.
 
The end result: We cut the drywall out of one wall to the height of the countertop. To fill in the space we used a piece of cabinet finishing board, about an eighth of an inch thick, painted so that in the hole at the bottom of the vanity you can't tell. The slide the vanity in place. We did have to put a piece of drywall back in the front of the vanity. We also had to add a piece of trim, but it is stained to match the vaniy and looks great!
 
 So the vanity is in place, and backsplash is on the wall. We used the same accent tile from the shower for the backsplash on the vanity. After cutting out the drywall we had to have a backsplash, and this countertop didn't have one.
 
Some really neat features of the vanity are the curved front and the copper sink.
 
The front of the vanity. 

Thursday, August 23, 2012

Live: Laundry Room Quick Fix

Laundry Room Before:
 The shelves above the washer and dryer provide great storage for cleaning supplies, kitchen overflow, and things that are not used often. However, the chaos drove me crazy. I constantly leave the door open, so you can see into the laundry room from the kitchen. The worst part was the clutter, I am ok with people seeing the washer and dryer.

I am a huge collector of Fiesta dishes, I have dishes displayed in my china cabinet, and the tablecloth on my kitchen table. Eventually I want to make valances out of the tablecloth too. I knew I wanted my laundry room to flow with my kitchen so I ordered another tablecloth to make a curtain to cover the shelves.

The stripes on the tablecloth went the perfect direction, I was able to fold it at one of the stripes, iron for a crisp line, and sew one quick line. I used a tension rod and drapery rings to hang the curtain.


The Finished Product

There was also enough space between the washer and dryer for a ClosetMaid 3 shelf organizer. It's a great place to keep laundry supplies, and my broom and Swiffer stand up behind it.